Descent Molten Core Beginning Area Strategy Guide
Read over the Conquest Molten Core Strategy
This is our typical Raid Group layout:
| Party Layout
|
| Group 1
|
| Druid1
|
| Warlock1
|
| Hunter1
|
| Paladin1a
|
| Main Tank T1 (Warrior1a)
|
|
| Group 2
|
| Priest1
|
| Mage1
|
| Rogue1
|
| Paladin1b
|
| Backup Tank 1 (Warrior1b)
|
|
| Group 3
|
| Druid2
|
| Warlock2
|
| Hunter2a
|
| Paladin2a
|
| Off-Tank T3 (Warrior2)
|
|
| Group 4
|
| Priest2
|
| Mage2
|
| Rogue2
|
| Paladin2b
|
| Hunter2b
|
|
| Group 5
|
| Druid3
|
| Warlock3
|
| Hunter3
|
| Paladin3a
|
| Off-Tank T2 (Warrior3a)
|
|
| Group 6
|
| Priest3
|
| Mage3
|
| Rogue3
|
| Paladin3b
|
| Backup Tank 2 (Warrior3b)
|
|
| Group 7
|
| Druid4
|
| Warlock4
|
| Hunter4a
|
| Paladin4a
|
| Priest 4a
|
|
| Group 8
|
| Priest4b
|
| Mage4
|
| Rogue4
|
| Paladin4b
|
| Hunter4b
|
|
Player roles:
| Druid
|
| 1. Druid's main job is to stand back and heal.
|
| 2. Do not use Moonfire. If there's a reason to cast a damage spell, use Wrath instead. Moonfire takes up a debuff slot on the MOB.
|
3. Create a macro with the following 2 lines:
/yell Innvervate on %t
/cast Innervate
Use this Innervate macro instead of casting Innervate by itself.
|
| 3. Do *NOT* use Innervate on yourself unless all the Priests have full mana. Priests are useless without mana. Druids are not. As soon as you hit around 1000 mana, cast Innervate on one of the priests, then go to Bear Form and help DPS.
|
4. By default the Druids should cast innervate as follows:
Druid1 on Priest1
Druid2 on Priest2
Druid3 on Priest3
Druid4 on Priest4b
|
| 5. If your Priest has more than 50% mana, Innervate another Priest that has less than 50% mana. If no Priest has less than 50% mana, Innervate yourself and keep healing until your mana is low again.
|
6. During a 2-MOB fight, each Druid needs to heal a specific tank:
Druid1: Main Tank T1
Druid2: Main Tank T1
Druid3: Off-Tank T2
Druid4: Off-Tank T2
|
7. During a 3-MOB fight, each Druid needs to heal a specific tank:
Druid1: Main Tank T1
Druid2: Off-Tank T3
Druid3: Off-Tank T2
Druid3: Off-Tank T3
|
| 8. Bring a full stack of Ironwood Seed. (For Rebirth)
|
| 9. Bring 2 full stacks of Wild Thornroot (For Gift of the Wild Rank 2)
|
10. Each Druid must buff Mark of the Wild/Gift of the Wild on his assigned Raid Members.
Druid1: Groups 1-2
Druid2: Groups 3-4
Druid3: Groups 5-6
Druid4: Groups 7-8
|
| 11. Druids also must buff Thorns on each Warrior in their assigned Buff groups.
|
| 12. If you get aggro, Barkskin and do not run away. Instead run toward where the MOB is supposed to be tanked and allow the tank to regain aggro.
|
| 13. If you get aggro, do not heal yourself. This generates more threat. Instead wait for someone else to heal you.
|
| 14. If the tank you're supposed to be healing dies, one of the Backup Tanks will take over. We will announce on Ventrilo which tank is taking over. Switch all your heals to the new tank.
|
15. Create a macro with the following 2 lines:
/yell Rebirth on %t
/cast Rebirth (Rank 5)
Use this Rebirth macro instead of casting Rebirth by itself.
|
16. Only use Rebirth on Warriors and Healers. Running out of Tanks is how we lose. By Default, Druids should Rebirth the following Warriors:
Druid1: Warrior1a
Druid2: Warrior2
Druid3: Warrior3a
Druid4: Warrior1b, Warrior3b
|
| 17. Only use Rebirth when the raid leader has OK'd it on Ventrilo.
|
| Hunter
|
| 1. Do not use stings. They take up a debuff slot.
|
| 2. Do not over-damage. The warriors need to hold aggro. Do not use rapid fire. You may use Arcane Shot but do it sparingly.
|
| 3. If you get aggro, Feign Death and do not run away. If feign death fails, run toward where the MOB is supposed to be tanked and allow the tank to regain aggro.
|
| 4. Hunter2b is in charge of Hunter's Mark. We will generally use Hunter's Mark to single out the MOB we will kill first during a pull.
|
5. When pulling multiple MOBs, we will often use a Paladin with Divine Shield. Hunters must pull mobs off of the Paladin and towards their assigned tank.
Hunter1 pulls to the Main Tank T1.
Hunter3 pulls to the Off-Tank T2.
Hunter2a pulls to the Off-Tank T3.
|
| 6. During a fight, do not shoot until the raid leader says it's ok on Ventrilo. If the tank loses aggro, stop attacking completely until the raid leader says it's ok again.
|
| Mage
|
| 1. Do not use fire spells. The burn takes up a debuff slot.
|
| 2. Do not over-nuke. The warriors need to hold aggro. Do not use Presence of Mind.
|
| 3. If you get aggro, use Ice Block if you have it. Otherwise shield yourself and do not run away. Instead run toward where the MOB is supposed to be tanked and allow the tank to regain aggro.
|
| 4. During a fight, do not use either wands or Arcane Missiles until the raid leader says it's ok on Ventrilo. The raid leader will allow you to use wands for a period of time before you can use any kind of other spells. If the tank loses aggro, stop attacking completely until the raid leader says it's ok again.
|
| Paladin
|
| 1. Each Paladin is assigned 1 or 2 blessings to buff. The raid leader will announce through Ventrilo who does which blessings on whom.
|
| 2. Paladin1a carries a soul stone on him at all times. If you're Paladin1a, notify the raid when your Soulstone is about to expire.
|
| 3. Stand back and heal until you're out of mana. The Warriors all have blessing of light, so the heals will be effective.
|
| 4. If you run out of mana you can go in and fight unless you're Paladin1a with the Soulstone.
|
| 5. Bring a full stack of Symbol of Divinity.
|
6. Create a macro with the following 2 lines:
/yell Divine Intervention on %t
/cast Divine Intervention
Use this Divine Intervetion macro instead of casting Divine Intervention by itself.
|
| 7. Do not use Divine Intervention unless for some reason, Paladin1a does not have a soulstone.
|
| 8. If your Priest has more than 50% mana, Innervate another Priest that has less than 50% mana. If no Priest has less than 50% mana, Innervate yourself and keep healing until your mana is low again.
|
9. During a 2-MOB fight, each Paladin needs to heal a specific tank:
Paladin1a: Main Tank T1
Paladin1b: Main Tank T1
Paladin2a: Main Tank T1
Paladin2b: Main Tank T1
Paladin3a: Off-Tank T2
Paladin3b: Off-Tank T2
Paladin4a: Off-Tank T2
Paladin4b: Off-Tank T2
|
10. During a 3-MOB fight, each Paladin needs to heal a specific tank:
Paladin1a: Main Tank T1
Paladin1b: Main Tank T1
Paladin2a: Off-Tank T3
Paladin2b: Off-Tank T3
Paladin3a: Off-Tank T2
Paladin3b: Off-Tank T2
Paladin4a: Main Tank T1
Paladin4b: Off-Tank T2
|
| 11. Use Fire Resistance Aura when fighting Firelords, Ancient Core Hounds, and Core Hounds.
|
| 12. Use Devotion Aura when fighting Lava Annihilators, Lava Surgers, Molten Giants, and Molten Destroyers.
|
| 13. If you get aggro, Divine Shield or Blessing of Protection yourself and do not run away. Instead run toward where the MOB is supposed to be tanked and allow the tank to regain aggro.
|
| 14. If you get aggro, do not heal yourself. This generates more threat. Instead wait for someone else to heal you.
|
| 15. If the tank you're supposed to be healing dies, one of the Backup Tanks will take over. We will announce on Ventrilo which tank is taking over. Switch all your heals to the new tank.
|
| Priest
|
| 1. Priest's main job is to stand back and heal.
|
| 2. Do not use Shadow Word: Pain or any kind of DoTs. They take up a debuff slot on the MOB.
|
3. Create a macro with the following line:
/yell Need Innervate
Use this macro whenever you are low on Mana.
|
4. During a 2-MOB fight, each Priest needs to heal a specific tank:
Priest1: Main Tank T1
Priest2: Main Tank T1
Priest3: Off-Tank T2
Priest4a: Off-Tank T2
Priest4b: Off-Tank T2
|
5. During a 3-MOB fight, each Priest needs to heal a specific tank:
Priest1: Main Tank T1
Priest2: Off-Tank T3
Priest3: Off-Tank T2
Priest4a: Main Tank T1
Priest4b: Off-Tank T2
|
| 6. Bring 2 full stacks of Sacred Candle (For Prayer of Fortitude Rank 2)
|
7. Each Priest must buff Power Word: Fortitude/Prayer of Fortitude on his assigned Raid Members.
Priest1: Groups 1-2
Priest2: Groups 3-4
Priest3: Groups 5-6
Priest4a: Group 7
Priest4b: Group 8
|
8. Priests also must buff Divine Spirit on all raid members with mana.
Priest1: Groups 1-4
Priest3: Groups 5-8
|
| 9. If you get aggro, Fade and Power Word: Shield yourself and do not run away. If you still have aggro, run toward where the MOB is supposed to be tanked and allow the tank to regain aggro.
|
| 10. If you get aggro, do not heal yourself. This generates more threat. Instead wait for someone else to heal you.
|
| 11. If the tank you're supposed to be healing dies, one of the Backup Tanks will take over. We will announce on Ventrilo which tank is taking over. Switch all your heals to the new tank.
|
| Rogue
|
| 1. Do not use damage-over-time poisons. They take up a debuff slot. Use only direct damage poisons
|
| 2. Do not over-damage. The warriors need to hold aggro. You may use Eviscerate but only if you have enough energy to Faint afterwards.
|
| 3. If you get aggro, Vanish and do not run away. If Vanish fails, run toward where the MOB is supposed to be tanked and allow the tank to regain aggro. Stop hitting the MOB.
|
| 4. Do not use Expose Armor. Warriors cannot Sunder Armor if the MOB has his armor exposed.
|
| 5. Never stealth unless it's to Vanish when you get aggro. Stealthing prevents people from buffing you.
|
| 6. During a fight, wait until the mob is at 90% health before going in and attacking. This allows the tank to build up threat.
|
| Warlock
|
| 1. Except for Curse of Shadow, do not use curses. They take up a debuff slot.
|
| 2. Do not use Corruption or Immolation. These spells also take up a debuff slot.
|
| 3. Do not over-damage. The warriors need to hold aggro.
|
| 4. Warlock1 is in charge of putting Curse of Shadow on the MOBs. If Warlock1 dies, it goes to Warlock2 etc. Curse of Shadow is necessary for improving the damage of Shadow Bolt and Arcane Missiles.
|
| 5. Warlock1, Warlock2 and Warlock 3 should use the Imp for the Blood Pact Stamina buff on the Warriors in their groups.
|
| 6. Warlock4 should use Felhound to help remove debuffs from people in the raid.
|
7. Disable autocast on Flame shield. Instead Manually cast it on your assigned Warriors.
Warlock1: Warrior1a, Warrior1b
Warlock2: Warrior2
Warlock3: WArrior3a, Warrior3b
|
| 8. If you get aggro do not run away. Instead run toward where the MOB is supposed to be tanked and allow the tank to regain aggro. Stop hitting the MOB.
|
| 9. During a fight, wait until the mob is at 95% health before attacking. This allows the tank to build up threat.
|
10. The Soulstone order is as follows:
a. Warlock1
b. Warlock2
c. Warlock3
d. Warlock4
Warlock1 must keep a Soulstone on Paladin1a. If we wipe and Warlock1's Soulstone is on cooldown, Warlock2 uses his Soulstone on Paladin1a and so on and so forth.
|
| Warrior
|
| 1. Do not use Sunder Armor on the MOB you are fighting unless you are the assigned tank for that MOB.
|
| 2. Use a shield and a one-handed weapon so you can survive longer and shield block/revenge and shield wall.
|
| 3. If you're tanking, do as much damage, and as many moves to generate as much threat as possible. If you're not tanking, do not.
|
| 4. Warrior 1a is the default Main Tank T1. He tanks the MOB we kill last.
|
| 5. Warrior 3a is the default Off-Tank T2. He tanks the MOB we kill second to last. If there is only one MOB he doesn't tank.
|
| 6. Warrior 2 is the default Off-Tank T3. He tanks the MOB we kill third to last. If there are less than 3 MOBS, he doesn't tank.
|
7. Warrior 1b and Warrior 2b are the 2 Backup Tanks. When a tank dies, another warrior fills in the roll in the following priority:
1st Dead Tank: Warrior1b
2nd Dead Tank: Warrior3b
3rd Dead Tank: Warrior2
4th Dead Tank: Warrior3a
5th Dead Tank: Warrior1a
3rd-5th Dead Tank replacement assumes we're fighting fewer than 3 mobs or have Rebirthed warriors who died before.
|
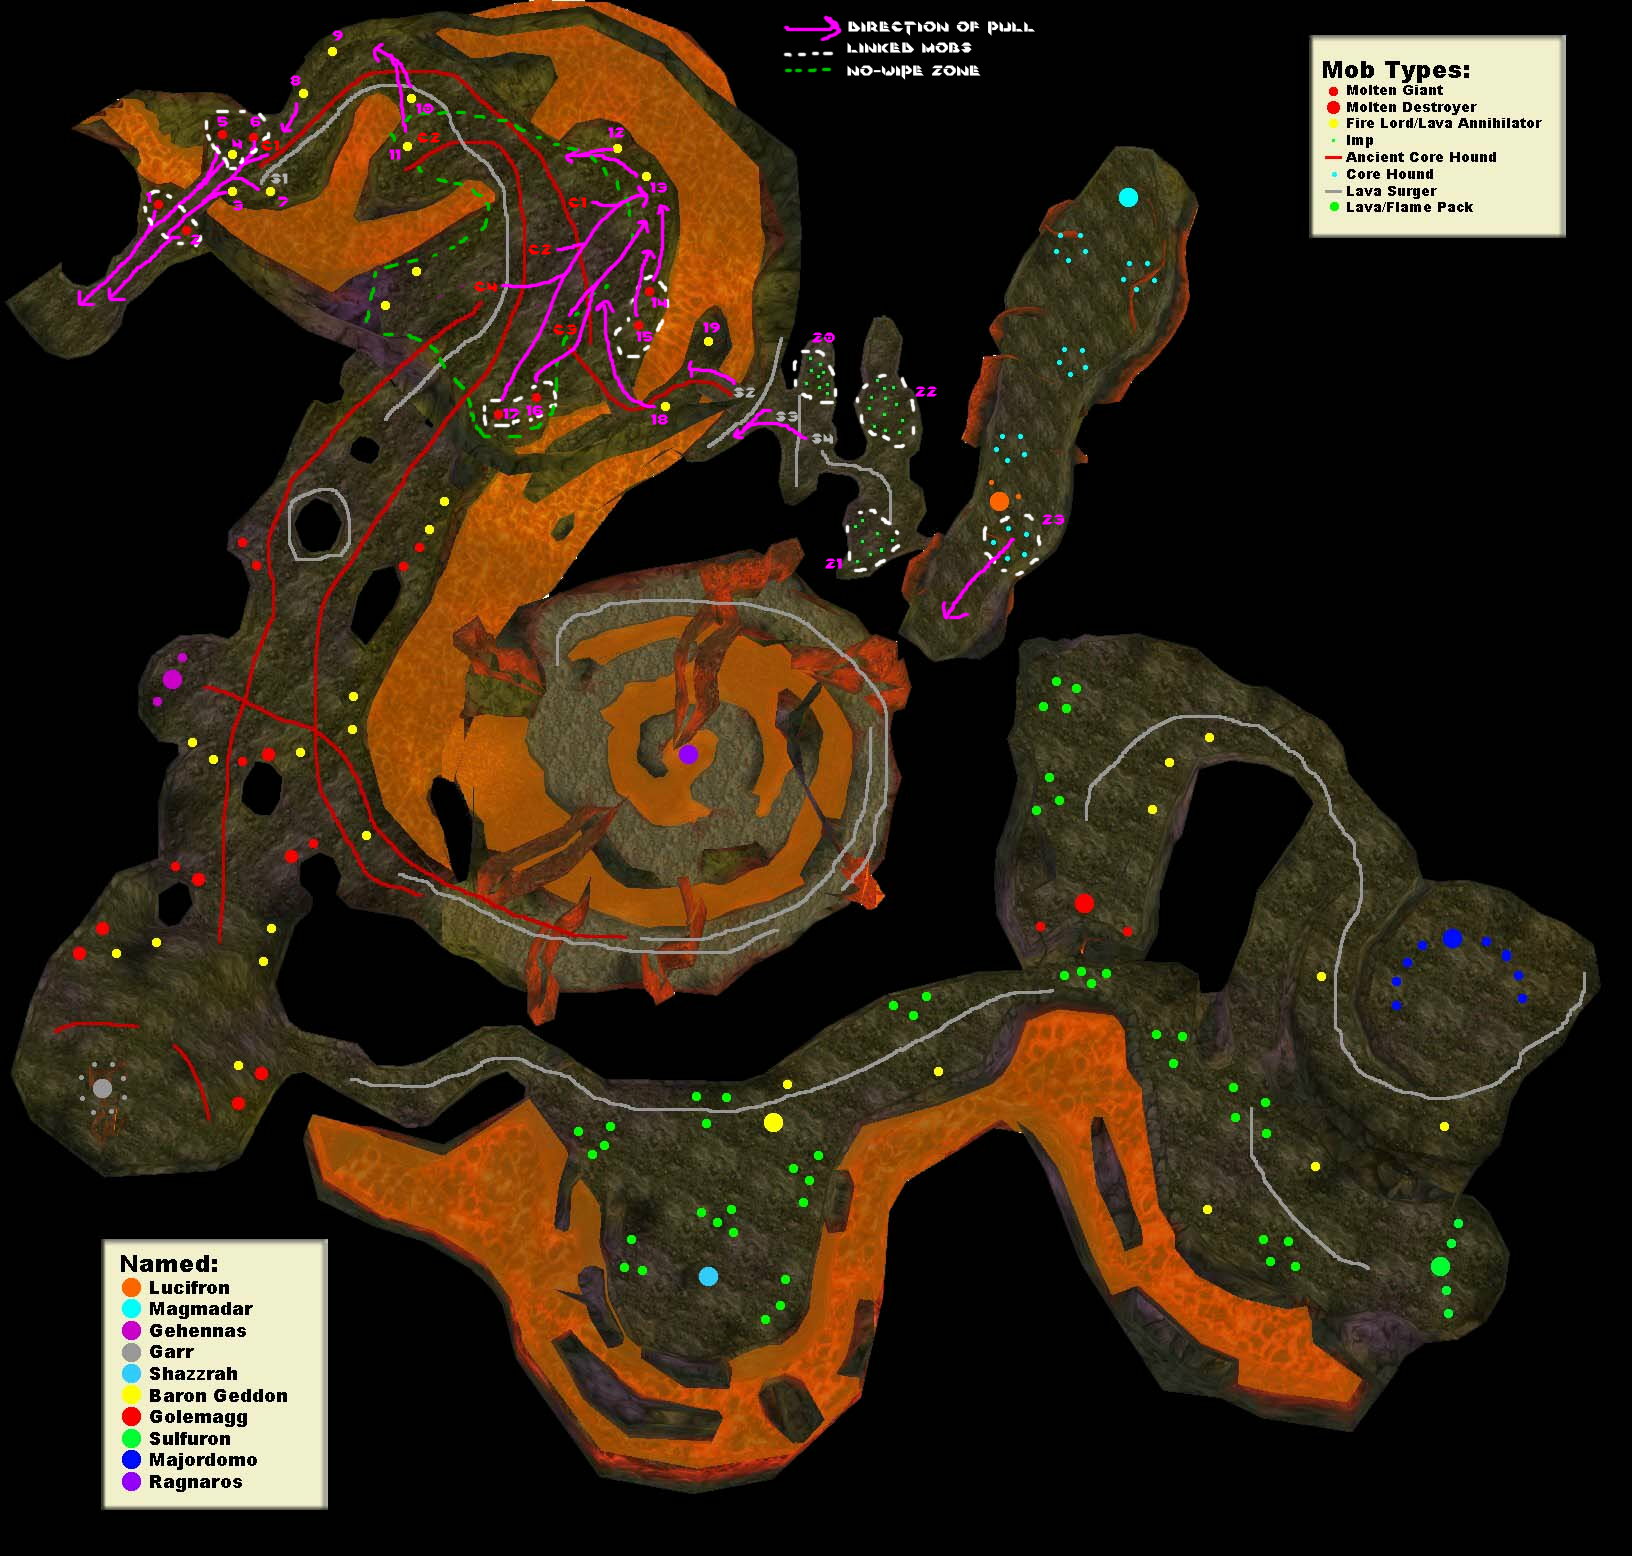
This is a modified Conquest Map that shows the direction in which we need to pull each MOB.
Each MOB on the map has a number that roughly corresponds to the order in which we'll kill it. The fast-respawning patrols have numbers C1, C2, C3... etc. for Ancient Core hounds and S1, S2, S3... etc. for Lava Surgers. All other MOBs have a simple purple number next to their spawn locations.
|
